


Handbook
Tool Demo: DROID
Introduction
On this page we will look at the characterization tool DROID, including how to install, open, and use the tool. DROID was developed by the Digital Preservation department of The National Archives (UK) (TNA) and ti is free to download from TNA’s website and is supported by a thorough user guide. There is an active community of DROID users and the tool has also been integrated into a number of larger repository systems.
How does DROID work?
DROID uses three different methods for identifying file formats, these are an analysis of the file’s:
- Extension
- Signature, and
- Container
The metadata provided by DROID for each file will say which method was used to identify the individual files.
If DROID identifies the file by its extension this means that the format was identified purely on the basis of its file extension. Such an identification may not be reliable, as file extensions can easily be changed, and many file formats and versions of file formats have the same extension.
A signature identification means that a format was identified by finding a specific pattern in the byte sequence, usually in the header of the file. The sequence is unique to a particular file format and version. This method is much more reliable than identification by extension only.
A container identification means that a format was identified by finding embedded files, often with signatures of their own, inside the main file. For example, OpenDocument word processing files are actually zip files containing xml files, images or other resources used in the document. A container identification would identify the main file as an OpenDocument file, not a zip file. This method is very reliable, as not only does the broad type of container have to be identified (for example zip), but the zip file must then be opened, and files inside scanned for further identifications to be made.
DROID and PRONOM
To allow DROID to make its identifications it needs access to information about file formats and their characteristics to use for comparison. For this, DROID uses PRONOM, a technical registry also developed and maintained by the UK National Archives.
PRONOM is a large database of information on file formats and the software products that support them. A PRONOM record can include information such as the version of the format, what compression and encoding standards are used, if a specification can accessed and where it can be found, and who owns or manages the specification. This is all information that can be very useful for digital preservation.
When generating metadata about files it has analysed, DROID not only lists the method of identification used, but also includes a unique identifier for the format in PRONOM. This allows a link to be made between the metadata and the corresponding format record in PRONOM.
PRONOM records for commonly used file formats generally include more detail than rare or niche formats. The UK National Archives does, however, welcome contributions from the community to help enrich the data held in PRONOM.
Why Use DROID?
DROID is a great tool to use when starting out in digital preservation for several reasons:
- First, it is free to download, easy to access, install and set-up, and there is an excellent user guide.
- Second, it has a straightforward, simple user interface. Many other characterization tools do not have a user interface at all, working only from command line instructions.
- It also can identify one of the biggest ranges of file formats amongst similar tools, thanks to the richness of the data in PRONOM.
- Next, we can have confidence in its continued support by The UK National Archives, as they use it in their own digital preservation processes.
- Finally, it can produce, with a high-level of reliability, the basic metadata we need for understanding the digital content we have. It will then allow us to export this metadata in different formats including comma separated value files that can be easily used in Excel or uploaded to a database. It can also produce a variety of summary reports.
What information can DROID provide?
A DROID analysis can produce up to eighteen pieces of metadata for each file. This includes:
- The file name, size, last modified date, and file path: this records what the file is called, how big it is, when it was last edited and where the file is stored on the system
- The identification method used and the status of the DROID analysis: letting us know how DROID identified the file and whether the analysis was successful or if there was an error or problem accessing the file
- The file type, extension, format, version and PRONOM identifier: this covers some key characterization information, so we know what type of file it is and what format (including version) it is. An identifier that links to the relevant format description in PRONOM is also included. Allowing access to more information.
- DROID can also generate checksums according to three different standards to facilitate integrity checking.
Downloading, Installing, Opening and Setting-Up DROID
As mentioned above, DROID is available to download for free from TNA's website. The tool will come packaged in a .zip file. To install DROID, all you need to do is make a new folder to contain the files in the .zip file, and then extract the files to this location. To extract the files, right click on the .zip file and click “Extract All”, this will then let you select where you wish to save them.
The following video shows how to open DROID and set some initial preferences:
Creating a DROID Profile
When using DROID to analyze files we can save our work in a format called a DROID profile. We create a profile then add one or more folders to it that we would like to analyze. In video below we will walk through creating and saving a profile before adding a folder for analysis.
Running DROID and Exporting Data
Now we have a profile set up and folders added, it is time to run DROID to analyze our files. In the video below we will walk through starting the analysis and exporting the results so we can use the data. It is recommended that you save your exported data as a .csv (Comma Separated Value) file as this can be opened in excel or uploaded into a database for use as metadata. In particular this information can be used in a verifiable file manifest. Also, look out for the “Hash” column which contains checksums.
DROID Reports
A really useful piece of functionality offered by DROID is the ability to generate a number of summary reports based on its analysis of files. These reports can provide a comprehensive breakdown of the files analyzed, counts of files organized by a variety of different criteria, as well as reports on any unreadable files and folders. In the video below we’ll take a walk through the process of generating and saving a report in DROID.
Tool Demos
 Illustration by Jørgen Stamp digitalbevaring.dk CC BY 2.5 Denmark
Who is it for?
Digital Preservation Practitioners (DigCurV Practitioner Lens) in repositories, publishers and other data creators, third party service providers.
Assumed level of knowledge
Novice to Intermediate
Purpose
- To provide a bridge to and achieve synergies with, the Novice to Know-How learning pathway.
- To provide readers with practical digital preservation skills through the capacity to operate common tools.
Tool Demo: Fixity Pro
Introduction
On this page we will be looking at how to use an integrity checking tool called Fixity Pro. We will start with an introduction to the tool and why it is useful. We will then cover how the tool works, and downloading and installing it, before going step by step through setting it up for integrity checking. Finally, we will examine the results that Fixity Pro produces, and how we can use this information. So, time to answer the first question: What is Fixity Pro?
What is Fixity Pro?
Fixity Pro is an integrity checking tool developed and maintained by an organization called AVP. Unlike some other integrity checking tools, it was developed specifically for the Digital Preservation community, with common processes/workflows in mind. Fixity Pro can be downloaded on AVP’s website and there is a small monthly subscription cost (reduced for those who pay annually). There is also a full user guide available, and AVP maintains a user group forum to provide information and support. Also, unlike some other tools, Fixity Pro is available for both Windows and Mac.
Fixity Pro not the first version of the tool, an earlier version known as simply “Fixity” has been available for free for a number of years. This version is still downloadable from the AVG website but technical support is no longer available.
Why Use Fixity Pro?
As mentioned above, Fixity Pro was developed with digital preservation processes in mind. It, therefore, offers additional functionality to help with digital preservation tasks that other tools do not. The most important benefit of using Fixity Pro is that it allows for the scheduled automation of integrity checking. Once set-up correctly, Fixity Pro will carry out regular integrity checks and staff will only need to intervene in the process if an error is identified. Fixity Pro also automatically saves the results of the process in easy to interpret reports which it can email to you.
Fixity Pro does, however, have a few limitations. The most important of which is that is only offers a choice of two checksums types, although they are two of the most popular, MD5 and SHA-256. Also, we must be able to link the tool to an email account, which might be difficult for those at organizations with strict controls on their systems.
How Fixity Pro Works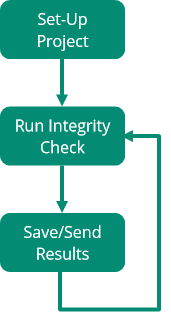
The process of integrity checking with Fixity Pro revolves around the creation of “projects”. In each project one or more folders are added and integrity checks are scheduled at regular intervals to monitor the integrity of the files in over time. Checks can be scheduled daily, weekly, or monthly. Unless content is at high risk, monthly checks will likely be enough for most content. Also, although Fixity Pro does scale up reasonably well, if you are scheduling a check on a large collection you may wish to set this for a time the computer is not used for other work.
The tool then carries out the integrity checks automatically as scheduled and both saves the results in a nominated folder and emails them to addresses that have been added to the project. The results are stored in two files, a manifest which lists the files and their checksums, and a report on the outcomes of the integrity check. Once set up, the tool will continue to carry-out the checks as scheduled until the project is removed.
Outcomes of an Integrity Check with Fixity Pro
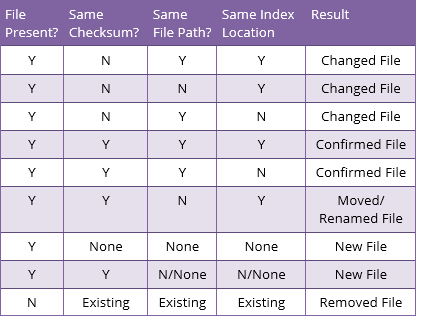 For each file it checks, Fixity Pro will report if the file is “confirmed” (the same), “changed” (the file contents), “new”, “removed” (deleted), and “moved and/or renamed”.
The table on the left shows the four criteria that Fixity Pro checks and how it decides the status of each file according to these categories. This table is from the Fixity Pro User Manual.
Downloading and Installing Fixity Pro
A 30-day free trial of Fixity Pro can be downloaded from the AVP website. It is available here: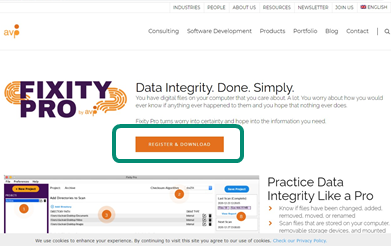
https://www.weareavp.com/products/fixity-pro/
You can also access the User Guide and other supporting resources from this page.
When you click on the “Register & Download” button, you will be asked to provide your name, organization, and email. You will then receive an email to confirm your registration. Clicking the link in the email will take you to a page where you can download Fixity Pro. Double-click on the downloaded file and follow the instructions to install. You will require an activation code to finish the installation process and this will be emailed separately.
Once your free trial has expired you will need to take out a monthly or annual subscription to continue use.
Setting Email Preferences
Simple Mail Transfer Protocol (SMTP)
 To allow Fixity Pro to email integrity check results, we must provide a connection to an email account. This is done using an SMTP (Simple Mail Transfer Protocol) connection or the Google API for Gmail. Email reports sent from Fixity Pro will then come from this account.
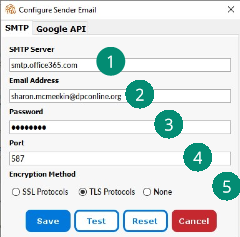
To set up an SMTP connection, click on Preferences, then “Configure Sender Email”. In the pop-up box enter the following information:
- The SMTP server (e.g. smtp.office365.com)
- The email address (e.g. This email address is being protected from spambots. You need JavaScript enabled to view it.)
- The email account password
- The port that should be used to make the connection
- What type of encryption is used (SSL, TLS, or none)
If you do not know the information needed in 1, 4, and 5, you may need to ask an IT colleague for help. It is possible to find this using a simple Google search for most common email providers. Also keep in mind that some networks may not allow this type of connection.
Gmail
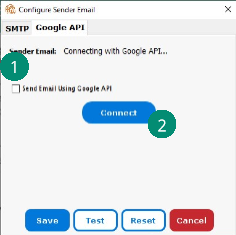 Establishing a connection to a Gmail account is much easier. We simply need to follow these steps:
- Select the box “Send Email Using Google API”
- Click the “Connect” button
- Sign in to the relevant Gmail account
- Click “Allow” button to let Fixity send emails on your behalf.
Both options allow you to test the email connection using the “Test” button. If an email does not appear in the relevant inbox, also check the SPAM folder as it may be redirected there.
No matter which option is used, remember to click the “Save” button to save the email preferences.
The “Reset” button can be used to clear current email preferences.
Other Preferences
There are a few other preferences available in Fixity Pro that you may wish to set, although they are not required as the email connection is.
Those settings are:
Filter Files – this allows the user to filter out particular file types by extension, e.g. this is often used to filter out system files like thumbs.db in Windows.
Import Project – allows the user to import a file created in another instance of Fixity. This might be used when receiving a deposit.
Checksum Algorithm – this is where you can choose between the MD-5 and SHA-256 checksum types. This preference is only available when you have a project listed.
Reports Location – this allows you to select a folder for where the reports from checks will be saved. The default is in the “Documents” folder.
Now that all the preferences are set, you are ready to create a project and run an integrity check.
Creating a Project and Running an Integrity Check
In the video below we will work step by step through a demo of how to create a project in Fixity Pro and run an initial integrity check. The steps in creating a project relate closely to the four boxes you will find on the interface:
- Starting and naming a new project
- Adding the folders to be checked
- Scheduling the integrity checks
- Inputting the addresses for emailing reports
Results Reports
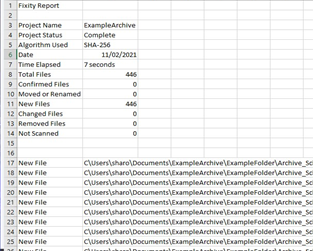
The image on the right shows a snapshot of a results report from Fixity Pro. The results are produced in a .tsv (tab separated values) format which can be opened in a simple text editor like Notepad or a spreadsheet program like Excel.
The report provides a summary at the top and details for the files below. In this example, opened in Excel, we can see that the check was carried out on 11/02/21, took 7 seconds to complete, and found 446 “new” files (as this was a first check). Future checks will have “confirmed” files if all is OK, or other types of files (as discussed previously) if there are errors or changes. Each check runs its comparison against the previous check, so if errors are discovered and fixed a new manual check should be run to reestablish the correct checksums.
Tool Demo: CSV Validator
Introduction
In the section on the tool DROID we look at how to use it to characterize digital content. There is it noted that DROID also has the functionality to generate checksums, although it does not offer integrity checking. We can, however, use the checksums generated by DROID with another tool from The National Archives (UK) (TNA) to carry out integrity checking. That tool is CSV Validator and this page will provide an overview of the tool and take you step by step through how to use it.
Please note: if you are not familiar with the tool DROID, it is recommended that you read through that content before working through this page.
What is CSV Validator?
 CSV Validator was developed by TNA to allow automated validation of metadata supplied by depositors of digital content. It compares the metadata with a schema, a type of file that details the requirements for the structure and content of a document. In addition to using CSV Validator for checking metadata, the Digital Preservation team at TNA have created a publicly available schema that can be used with the tool to enable integrity checking. The tool uses the schema alongside a .csv file of data exported from DROID after characterization to carry out the check. CSV Validator generates a checksum for each file and, according to the rules in the schema, compares it with the information in the DROID generated .csv file, and highlights any errors found. For example, missing files or mismatched checksums.
Why Use CSV Validator?
If you are already planning to use DROID for characterization, and generating basic metadata, using the outputs with CSV Validator for integrity checking can make sense. It means that you do not need to store checksums separately, reducing the number of additional files you need to keep alongside the digital content. CSV Validator also provides useful details in its results log when an error is detected during integrity checking, which can make identifying issues easier.
The main drawback of CSV Validator is that it is a bit more awkward than other tools to use for integrity checking after moving a file. It requires the user to provide extra information about where the files were and where they have been moved to. We will, however, cover how to do this on this page. The need to use a schema can also be off-putting for some, but it is actually quite straightforward. Finally, the tool is only available for those with Windows or UNIX/LINUX computers.
Downloading CSV Validator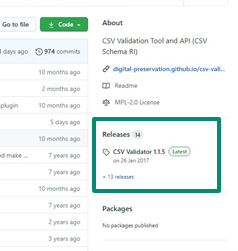
CSV Validator and the schema you will need for integrity checking are both available for the TNA’s Digital Preservation Team’s repository on the website GitHub.
CSV Validator can be downloaded via the “Releases” section here: https://github.com/digital-preservation/csv-validator (see right).
The Schema document (DROID_integrity_check.csvs) can be downloaded here: https://github.com/digital-preservation/droid-csv-schema.
To run CSV Validator you also will also need to have Java installed on your computer. If you need to install Java you can find it here: https://www.java.com/en/
Opening CSV Validator
CSV Validator is not installed on to your computer in the same way most apps we use are. Rather we must open it from the files we downloaded each time.
To open CSV Validator, we must first extract the files from the .zip file we downloaded. These can be saved wherever is convenient on your computer. Next, navigate to the “bin” folder, which is in the main folder. To open the tool on a Windows computer we then double-click on the “validate-gui.bat” (Batch) file. A command line window will appear (do not close this) and then the interface for CSV Validator.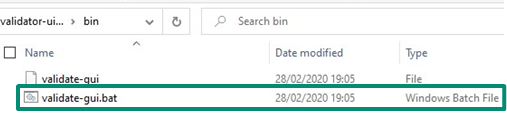
Editing the Schema
The final step we need to complete before running an integrity check with CSV Validator is editing the schema document. The document is quite intimidating at first, but there is actually only one small part of the document that needs to be edited.
The easiest way to edit the file is to open it in a simple text editor such as “Notepad”. The first twenty-eight lines are notes on the schema and how to use it, so those can be ignored. The line you need to edit is the following:
URI: fileExists integrityCheck("","files","includeFolder")
All that needs changed is to replace the word “files” with the name of the top level folder of the digital content covered by the relevant DROID report. You will need to edit the schema for each new DROID report you run the process with. It is also important not to change the file extension of the schema file, it should be “.csvs”.
Once the tool is downloaded and the schema prepared, we are ready to run an integrity check.
Running an Integrity Check
In the video below we will work through the steps of running an integrity check using CSV Validator and our DROID output, starting with opening the tool from its “batch” file. In this example we assume we have already prepared our schema file and that the digital content has not been moved since we created the DROID output file.
Saving the results of the integrity check can act a record of the successful completion of the process. The saved file is not assigned a file type automatically, so it is important to type a file extension when saving. In the example we chose to save the results as a Text (.txt) file.
In this example the check was successful, resulting in a PASS for all files. But what happens if an error is detected?
Finding an Error during an Integrity Check
In the video above we ran an integrity check where the results said everything was OK (i.e. no files had changed or were missing). This time round the files are from a less perfect future where some errors may have occurred…
 The image above shows the results file from the integrity check process. The first two errors relate to a file called “MyPDFCat.pdf”, showing that there has been a fail for the “fileExists” check and also that is was not found when trying to generate checksums. Therefore, we can assume this file has been deleted or moved out of this folder.
The third error shows that the checksum does not match for the file “MyPlainTextCat.txt”, in this case we can assume that a change has been made to the file. We will need to investigate both of these errors further and may need to replace the files from another copy.
What if the Digital Content Had Been Moved?
The two demos above assumed that the digital content had not been moved since the DROID analysis had been completed. But, one of the most important times to complete an integrity check is after moving content (for example, from an ingest processing area of the network to an archive drive). As CSV Validator uses the file path information in the CSV file to locate the files for the integrity check, we must provide it with details of where the files have been moved to. This is done using a “path substitution”. The video demostrates the process again also including a path substitution.
Although the process for entering a file path substitution is relatively straightforward, getting the file path correct can sometimes take a bit of trial and error. If CSV Validator produces results that state the files do not exist, this is normally an indicator that there is an error in file path entered (rather than all of the files have been lost!) So be prepared that you might need to try the process a few times before it works perfectly….
Copying Digital Content
Introducing Robocopy
Robocopy, or “Robust File Copy”, is a file copying command that provides more resilient and reliable copying functionality than the standard Windows copying functions using the Windows Explorer GUI. Some of the reasons it is a superior option include that it:
- Can tolerate network interruptions and resume copying
- Is more reliable when copying the file data and its attributes
- Can copy files and folders with file paths longer than 256 characters
- Has lots of customization options for how to carry out the copying
- Provides a report at the end of the copying process
The customization options include choices about the file attributes to copy, whether to copy empty folders or not, and the ability to schedule copying for a particular time. This is particularly useful if copying a large amount of data as it can be scheduled for times your network is quieter (e.g. at night). As with other commands, the full list of options is available by typing help robocopy into the Command Prompt.
The robocopy Command
As mentioned above, there are lots of ways to customize the robocopy command, but we are going to concentrate on a relatively simple version of the command. The structure for this is as follows:
robocopy [source folder] [destination folder] [options]
Below is an example of a full command. Here we have written the command to tell the computer to copy the contents of the “ExampleFolder” to the folder “CopyExample” (if the folder we want to copy to does not already exist, the computer will create it). We have also included an instruction, “/e”, that we want all of the sub-folders copied, including those that are empty (so we copy the folder structure exactly).
robocopy “C:\users\sharo\documents\examplefolder” “C:\users\sharo\documents\copyexample” /e
Note that here we have included the full folder file path in inverted commas. Supplying the source and destination folders in this form ensures accuracy when the computer executes the command.
Report from robocopy Command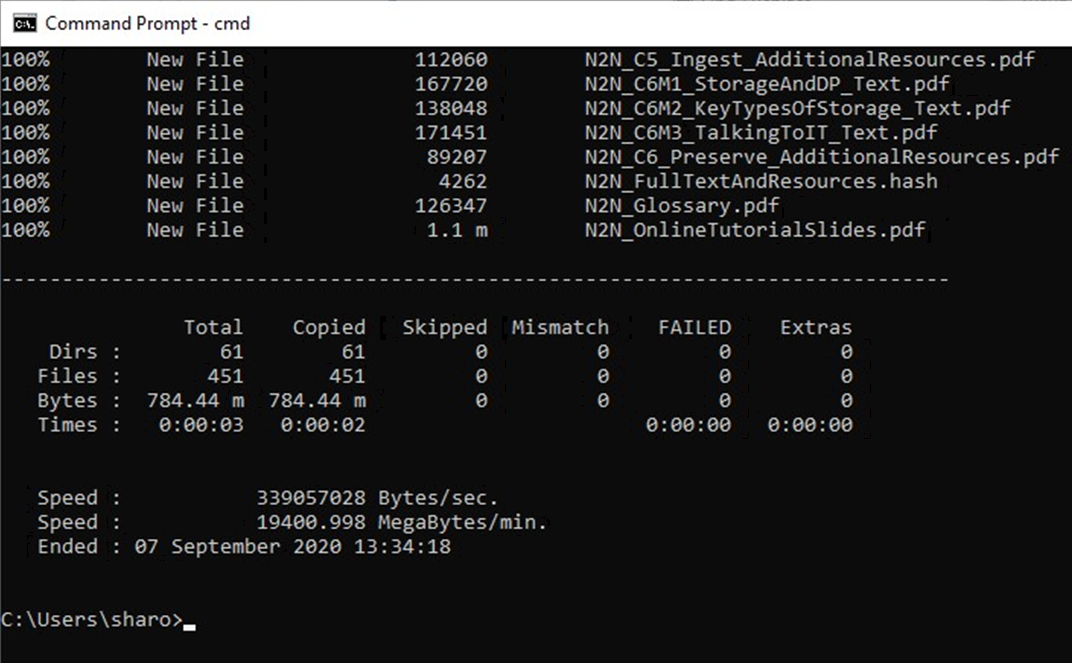
Above we noted that after executing a robocopy command you will receive a report on the process. The image on the right shows an example report after executing the command.
It lists how many folders (directories) were copied, how many files, their total size, and if any were skipped or failed, along with other more detailed information. This provides clear confirmation of the success (or otherwise) of the copy action.
Now it is time to try the robocopy command yourself.
Creating a Directory Listing
Why Create a Directory Listing
On a previous page in this section there are instructions on using the dir command to help us examine the contents of a folder. This is a particularly useful command for digital preservation as it can allow us to quickly generate a complete list of files and folders within a collection or area of our storage. Knowing what we have and where it is stored is essential for managing digital content.
On this page we will look at how to add criteria to a directory command (such as sorting the results in a particular order) and how to save the information to a separate file that can be accessed again later.
Adding Criteria to the dir Command
As mentioned above, it is possible to add criteria to the dir command to customize the information it will provide. The full of list of possible choices by typing help dir into the Command Prompt. The example command below shows some of the most useful criteria and explains what they are.

Saving the Directory Listing
To save the directory list that will be generated we need to add instructions on where to create the file, what to call it, and what file format it should be. This information is added to the end of the command after a ‘>’ symbol.
To save the file in the current folder we just need to specify the name of the file we want to create: dir /s /b /o:N > directorylist.txt
To save the file in a different folder we can specify this using a file path:
dir /s /b /o:N > C:\Archive\DirectoryLists\directorylist.txt
Saving the directory list as a text file (.txt) is a good option in the first instance. This can then potentially be loaded into a spreadsheet or database.
Now try this task for yourself by using the Command Prompt to navigate to a folder and creating a directory list for it. Consider trying it a few times with different criteria and comparing the outcomes.
Command Line Basics
Working with the Command Prompt
On this page we will have a look at some basics of how to use the Command Prompt. We will be walking you through how to open the Command Prompt and some of the basic commands you can use. This will help you become familiar with using the interface. Whenever a command is shown it will be written in italics.
To get the most from this guide, we recommend opening and working along with the instructions using the Command Prompt on your own computer. For each command we will give you clear instructions and information on what is happening.
Opening the Command Prompt
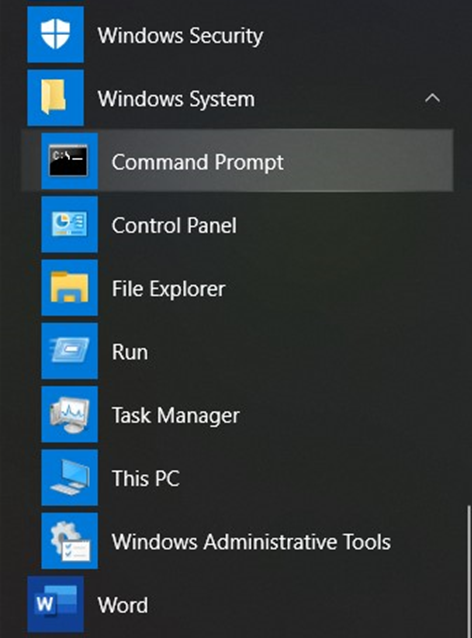
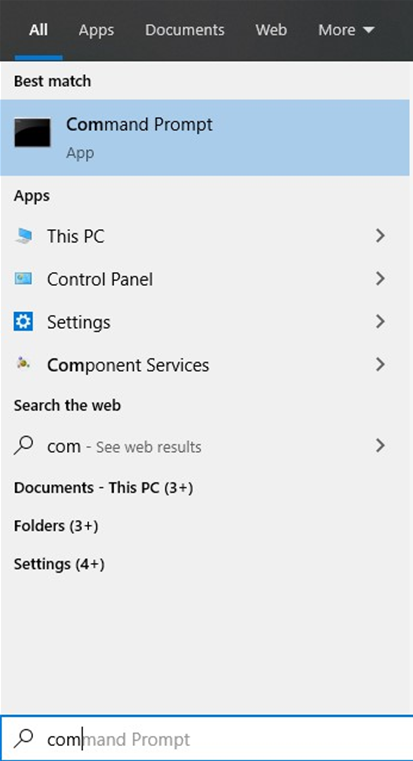 The Command Prompt is easily accessible through the main Windows menu available at the bottom left of the screen. There are two methods for locating and opening it:
Finding via a Search (left)
- Click the Windows Menu icon
- Start typing “Command Prompt”
- Click on the App listing that appears
Navigating Through the Menu (right)
- Click the Windows Menu icon
- Scroll down and click on “Windows System” Folder
- Click on “Command Prompt” listing
First View of the Command Prompt

When the Command Prompt first opens there are only a few lines of text on screen. They are the computer’s operating system (Microsoft Windows), the version (Version 10.0.18363.1016 in the above example), and a copyright declaration.
The next line is the command line where we can input our commands. The default is to start in the main folder for the user profile we are using. In the example above we are in the C: Drive in the sharo folder, which is a sub-folder of the Users folder. The current folder location will always be followed by a “>” symbol, this is where our commands will be entered.
As we begin to enter commands there are two important things to remember:
- Commands are not case sensitive
- We need to use a backward slash (\) for file locations and not a forward slash as we would with website addresses (/)
Moving Between Folders
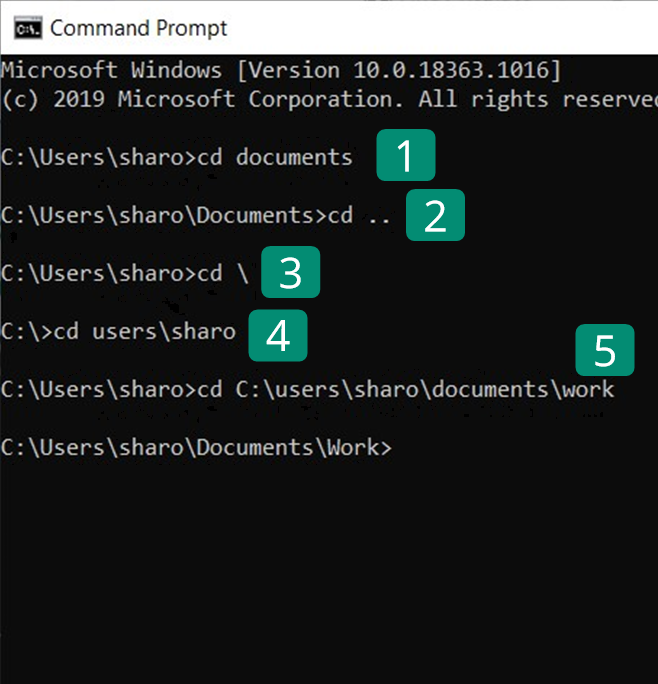 The first useful basic command we will use is for moving between different folders. The command to do this is “cd” (change directory). The image on the right shows five examples of the syntax that can be used for this command to make different moves. In each case the following line shows the file path for our new location in the folder structure. The five examples are:
- cd folder name – to move to a sub-folder of the current folder e.g. cd documents
- cd .. – moves to the folder above the current folder
- cd \ – jumps to the top level of the current drive
- cd folder name\sub-folder name – moves two levels down in the structure to the named sub-folder e.g. cd users\sharo
- cd file path – you can also type the full file path for the folder you wish to move to e.g. C:\users\sharo\documents\work
Using the Command Prompt you opened earlier try out each of these commands to move around the computer’s folder structure.
Viewing the Folder Structure
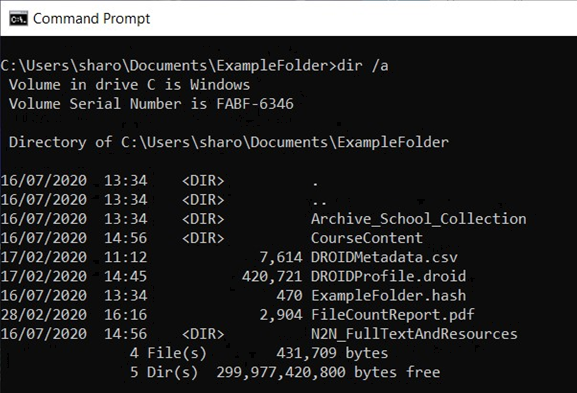 When navigating the folder structure in the Command Prompt it would obviously be useful to be able to view that structure. The examples on the left show two options using the dir and tree commands.
dir Command (top)
Using just the dir command will show information about the current directory and the files and sub-folders it contains one level down. Folders are indicated in the list by <DIR>.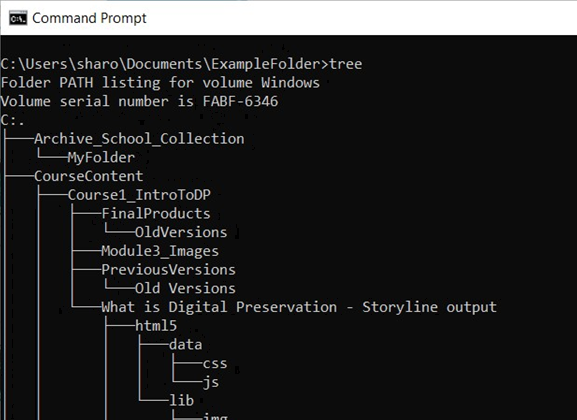 tree Command (bottom)
The tree command will display a tree diagram of all of the sub-folders contained below the current folder. As this includes all levels below this tree can lengthy for large/complex folders.
Now use your open Command Prompt window to try out the dir and tree commands and examine the results.
Renaming a File or Folder
The rename command will allow you to rename files and folders. When renaming objects in the current folder the structure of the command is as follows: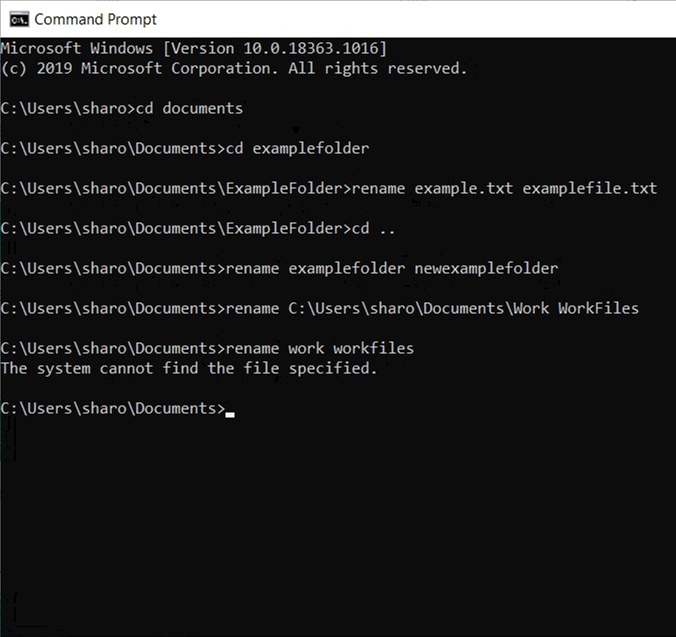
A File: rename [current file name] [new file name] – the file extension must be included e.g. rename example.txt examplefile.txt
A Sub-Folder: rename [current folder name] [new folder name] - e.g.
rename examplefolder newexamplefolder
If any of the names contain spaces they must be enclosed in quotation marks, e.g.: rename “example file.txt” “new example.txt”
Also, it is possible to rename a file or folder not in the current folder by including the full file path with the current name, e.g.:
rename C:\Users\sharo\Documents\Work WorkFiles
Now try these out yourself, but avoid using important files or folders in case of mistakes! The image on the right shows the examples listed above, note that a result is only shown if there is an error.
Accessing Information on Available Commands
 We have now looked at a few of the basic commands that can be used in the Command Prompt. If you would like to try others you can access a full list of default commands on the Command Prompt itself. You can also get information about the syntax that should be used for each command.
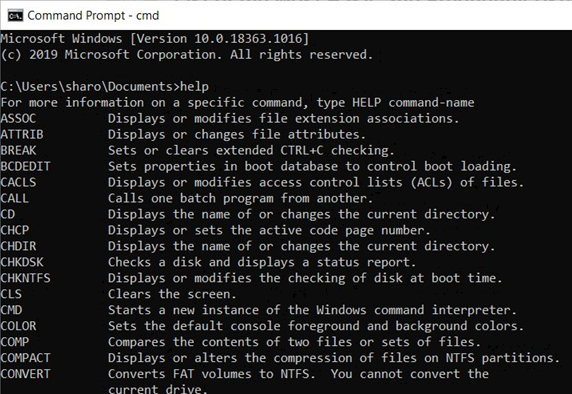
List of Default Commands:
help (see top example)
Information on a Command:
help [command], e.g. help dir (see bottom example)
On other pages in this section we examine how to use the Command 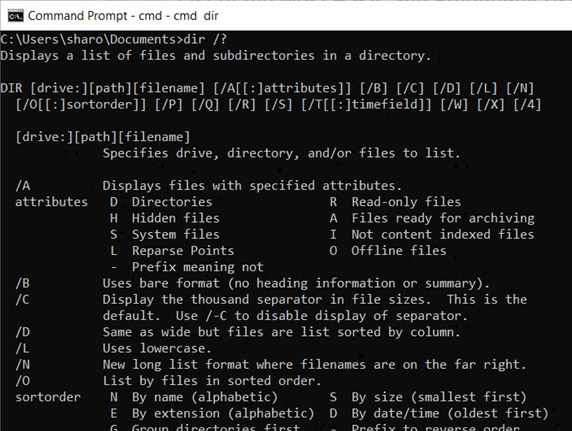 Prompt for two tasks that can help with Digital Preservation work: creating a directory listing and copying files.
About the Command Line
Introduction
On this page we are going to introduce command line interpreters. We will be focusing on the Windows version, which is called the Command Prompt. There are similar facilities in other operating systems, for example in Apple’s Mac OS it is known as Terminal. The principles of how to use the different versions are the same, but the commands (instructions) used differ.
The Command Prompt is a useful facility to be familiar with as it offers functionality that can be used in digital preservation processes, as well as being the interface for operating some key digital preservation tools, such as the characterization tool FITS.
We will start by looking at what a command line interpreter is, before taking you through some of the basic commands. Finally, we will look at two useful command line functions for digital preservation: creating a directory listing, and robocopy.
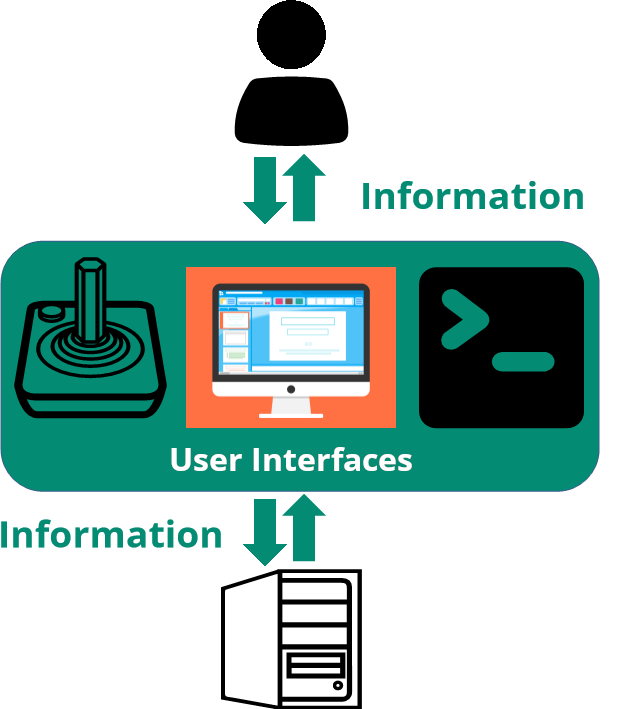
How We Interact with Computers
To help explain exactly what a Command Line Interpreter is, we will start by looking at the basics of how we interact with computers. Human interaction with computers is a two-way information exchange: we provide information to the computer, which it then processes and provides the results back to us. Any object that facilitates this interaction is known as a user interface.
A user interface can be comprised of a physical object such as a keyboard, screen, or joystick, and/or a piece of software such as a word processor or an email app. We are now most familiar with software user interfaces that allow us to interact with graphics such as menus and buttons, these are known as graphical user interfaces (GUIs). The web browser you are viewing this page in is a GUI.
There are also user interfaces that allow instructions to be input as text rather than through clicks on graphics. Command Line Interpreters such as the Command Prompt fall into this category of user interface.
What is a Command Line Interpreter?
Command Line Interpreters (CLIs) have been in use since the 1960s, when they were introduced as an alternative to inputting information and commands to computers using punch cards or similar physical sources.
A CLI is the software program that accepts the input of a text command, and any accompanying information, and processes it through a Command Line Interface into a form that can be used by the computer. Each CLI has a series of standard commands that users must know to instigate the related computer processes.
The Command Prompt is the default Command Line Interpreter of the Windows Operating System. It is also often referred to as cmd.exe, which is the name of its program file.
Pros and Cons of Using the Command Prompt
GUIs have become the most popular type of software interface as their graphical input makes them more intuitive and easier to master. There are, however, still some advantages to using a CLI such as the Command Prompt. The following is a quick summary of some pros and cons:
Pros
- No graphics means running a CLI requires fewer computer resources, therefore freeing up processing power for the task at hand.
- Some operations require only inputting a command of a few characters, which can be much quicker than clicking through a GUI’s menus.
- Multiple commands can be scripted to run automatically.
- A command history can be kept to document actions.
Cons
- Users must learn the syntax of the language used and relevant commands, so a higher level of user skills are required.
- Outputs are text based and can be harder to interpret than those presented in a graphical format.
- There is limited access to formatting options such as fonts.
Tool Demo: Checksum By Corz
Introduction
On this page we will look at how to use a popular tool for integrity checking, Checksum by Corz. We will start with the advantages and disadvantages of using the tool followed by:
- Downloading and installing Checksum by Corz
- Creating checksums
- Verifying checksums
- Finding an error while verifying checksums
Advantages and Disadvantages of Using Checksum by Corz
Unlike DROID, which is a characterization tool that can produce checksums, Checksum by Corz’s sole purpose is integrity checking. Before using it, it is worthwhile considering its advantages and disadvantages to make sure it is the right tool for your context.
Advantages
- Free and easy to download/install
- Very fast
- Very simple to use (good for non-specialists e.g. depositors)
- Saves checksums alongside content
Disadvantages
- Saves checksums in a custom format. While the files can be opened successfully in other apps it makes it more difficult to transfer to a processible format such as a spreadsheet
- Saves error logs as .html files rather than a processible format
- Not available for Macs
Downloading and Installing Checksum by Corz
The following video explains how to download and install Checksum by Corz. The link to download the tool is: https://corz.org/windows/software/checksum/
Creating Checksums
The following video explains how to create checksums for digital content using Checksum by Corz.
Verifying Checksums
The following video shows how to use the tool to verify checksums, allowing you to monitor the integrity of digital content over time.
Finding Errors When Verifying Checksums
The following video shows how the tool displays errors found during the verification process.
Tool Demo: Teracopy
Introduction
This page will provide an overview of a useful tool for digital preservation: Teracopy. It will start by introducing Teracopy and describing why you may wish to use it. We will then go through how to download and open the tool and what preferences to set, and will finish with how to use the tool to copy digital content safely.
About Teracopy
What is Teracopy?
 Teracopy is “file transfer utility”, a tool for copying or moving digital content, that provides an alternative to the built-in (and more limited) functionality that is available within Windows Explorer. It is available under a “freemium” licence: meaning that there is a free version that can be used for non-commercial purposes, as well as a paid-for Pro version with additional functionality that can be used in commercial environments. The free version is generally suitable for the purposes of digital preservation.
Why Use Teracopy?
The main reason to use Teracopy is that it incorporates integrity checking into its transfer process. An integrity check should be carried out whenever digital content is copied or moved, therefore using Teracopy streamlines the transfer process, consolidating two tasks into one. Teracopy also allows users to pause and resume a transfer of digital content, provides a detailed log of the folders and files copied or moved, and can output a copy of the checksums generated for future use. The only major failing of the tool is that if a file or folder is skipped due to an error occurring, Teracopy does not provide details of what type of error was encountered. It can be used for any copy action, including transferring content within a network or from external storage into your digital archive.
Downloading, Installing, and Opening Teracopy
Teracopy can be quickly and easily downloaded from the website of Code Sector, the software company that developed and maintains the tool. The link to use is as follows:
https://www.codesector.com/teracopy
You can also purchase the Pro version via this page, as well as making requests for new functionality, and finding information on the development status of new versions.
 Teracopy is easy to install, just double-click on the downloaded file and follow the instructions as with other software packages.
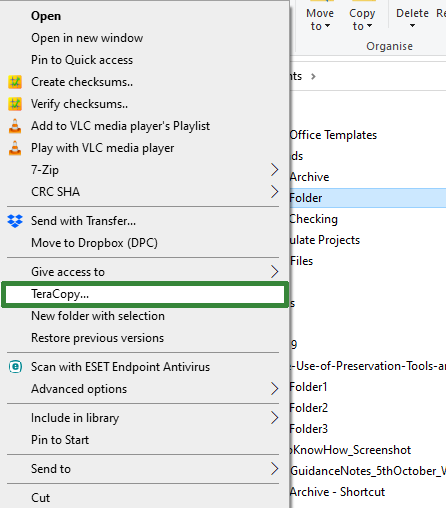
Once Teracopy is installed there are three ways to access it: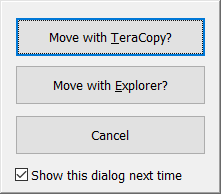
- Via the standard Windows menu.
- By right-clicking on a file or folder you want to move or copy (Teracopy will be listed on the menu (see left))
- A dialogue box will pop up when you start to carry out a copy or move action (e.g. by drag and drop) that will ask if you want to use Teracopy (see right)
Setting Preferences in Teracopy
In this section we will walk through a demo of setting your preferences in Teracopy. This will help you to get the most from the tool. It is particularly important as integrity checking is not a default setting within Teracopy. It must be turned on before the first time you use the tool.
Once you have set your preferences in Teracopy it is worthwhile closing the tool and reopening to ensure that the new settings are all ready for use. Before closing the tool interface, it should look like the version on the top left. Once the tool has been closed and reopened it should look like the bottom left window (if you have selected all of the options included in the demo). Now we will look at copying files with Teracopy.
Copying Files with Teracopy
With our preferences set, we are now ready to use Teracopy to robustly copy digital content. In this section we will walk through a step by step demo of how to set up and run a copy process in Teracopy.
Wrap-Up
Teracopy is an easy to use tool that will allow you to safely copy digital content.
Remember, after you have downloaded and installed the tool, and set preferences, the steps are simply as follows:
- Add the files/folders you wish to copy
- Identify where they should be copied to
- Make sure the correct type of checksums are being used
- Hit the “Copy” button to start!
If you opted to save the checksums from the process you can use Teracopy to check them at a later date (although it isn’t the quickest tool to use for large collections).