














































































































































Thinking about using AI?
1. What AI Is and How It Can Help
AI (Artificial Intelligence) refers to computer systems that can carry out tasks that usually require human thinking such as writing text, sorting information, or analysing patterns.
Community groups can use AI to:
-
Write or edit content (newsletters, social posts, funding applications)
-
Organise information (summaries, tagging, sorting documents)
-
Support planning (drafting policies, creating checklists, generating ideas)
-
Improve access (transcribing audio, translating text, creating plain‑language versions)
AI can save time, reduce workload, and help small teams do more with limited resources.
2. What Happens When You Put Information Into AI
When you type or upload information into an AI tool, it is processed by the system to generate an answer. Different tools handle your data differently, but you should always assume:
-
Your data may be stored temporarily. If you don’t have permission to share the data, or if it has legal restrictions attached, don’t put it into AI tools.
-
Your data may be used to improve the tool unless the provider states otherwise. This means your data could be used in answers AI gives to other people using the same tool as you.
-
Sensitive or personal information should not be shared unless you have permission and accept the risks described above.
Key point: AI tools are not private by default. Treat them like any other online service.
3. Risks and Things to Watch Out For
Using AI can be helpful, but it also comes with risks:
-
Privacy risks: Personal data, confidential records, or community stories may be exposed if shared with AI tools.
-
Accuracy issues: AI can produce incorrect or misleading information. Always check important outputs are correct.
-
Bias: AI systems can reflect unfair or harmful assumptions found in the data they were trained on.
-
Copyright concerns: AI may generate text or images similar to existing copyrighted material.
-
Over‑reliance: AI should support your work, not replace community knowledge or decision‑making.
Think carefully before entering anything sensitive, personal, or culturally important.
4. Types of AI Tools and What They’re Good For
Different AI tools do different jobs.
-
Chatbots / Writing Assistants Examples: ChatGPT, Copilot
-
Use for: drafting text, summarising documents, generating ideas, answering questions.
-
Image Generators Examples: DALL·E, Midjourney
-
Use for: creating illustrations, posters, or visual concepts.
-
Audio & Video Tools Examples: Whisper, Descript
-
Use for: transcription, captioning, editing audio/video.
-
Organisation & Search Tools Examples: AI‑powered search engines, document tagging tools
-
Use for: sorting archives, finding patterns, improving access.
-
Translation Tools Examples: Google Translate, DeepL
-
Use for: making content accessible in multiple languages.
Choose tools based on your group’s needs, skills, and comfort level.
5. Good Practice When Using AI
To use AI safely and effectively, keep these points in mind:
-
Decide what information is safe to share Avoid personal data, sensitive community stories, unpublished materials, copyright published materials, or any material you don’t have permission to share.
-
Check the output AI can make mistakes. Review everything before using it publicly.
-
Keep human oversight AI should support, not replace, community decision‑making.
-
Be transparent If AI helped create something, this should be noted in your documentation.
-
Think about long‑term preservation Save original versions of documents before AI editing. Keep records of how AI was used in your workflows.
-
Start small Try AI for simple tasks first, then expand as your confidence grows.
6. Final Thoughts
AI can be a powerful tool for community groups, helping with writing, organising, and improving access to information. But it must be used thoughtfully, with care for privacy, accuracy, and the values of your community. Start slowly, stay curious, and keep people at the centre of your decisions.
Adding Digitised Records to a Catalogue
 |
Cataloguing is not specifically a digital preservation task, but it is an essential part of providing access to your records. A clear catalogue helps people understand what you hold, how to find it, and whether it is useful for their research. This guide is for groups who already have a catalogue and want to add digitised versions of their items. It explains the basic principles to follow and outlines several options for including digital copies in your catalogue records. Catalogues open a door to your collections. They should be clearly structured, easy to understand, and contain enough information for someone to determine the value of each record. |
Pre‑Cataloguing
Before adding digitised records to your catalogue, gather all the information about your digitized files in one place. Your Digital Asset Register is the best location for this (see Understand Your Content, Level 3 of the Toolkit Matrix).
Decide what information you want to record about each digitized file and add the appropriate columns to your Digital Asset Register. The data you collect will depend on the cataloguing approach you choose. Common examples include:
|
File Format |
File Size |
Date of Digitization |
||
|
File Name / Reference Number |
Number of Digitized Copies |
File Resolution |
||
Principles of Cataloguing Digitised Records
These principles should be followed when cataloguing digitized records. If you have a cataloguing policy, add these principles to it.
-
The original physical item remains the primary record, with digital versions treated as access copies.
-
Be consistent with the terms you use and the information you provide for each item.
-
Keep descriptions clear and short.
-
Record all versions of a file in your catalogue, even if you are not providing access to them.
-
Clearly identify relationships between versions of the same record.
These principles support long‑term digital preservation by ensuring that digital copies are not lost, forgotten, or separated from their physical originals.
Approach Options
Different groups will choose different cataloguing approaches depending on their resources, catalogue structure, and number of digitised items. Two approaches are described below.
Single Record Approach is best when:
-
Your catalogue is simple
-
You have limited time or staff
-
You want all information in one place
-
You have only one or two digitized versions per item
Linked Records Approach is best when:
-
You have many digitized versions
-
You want clear separation between physical and digital items
-
You plan to expand your digital collections
-
You need detailed access or rights information for digital files
Single Record Approach
Using this approach, every item in your collection has one catalogue entry containing information about all versions of that item. Digitized versions do not have their own separate entries.
You will need to add new fields to your catalogue to include digital file information.
Important Notes
-
Use clear headings to distinguish format information.
-
Add format specific notes and access information to the same fields in every record.
Example –

Linked Records Approach
This option creates separate catalogue records for the physical and digital versions of each item. Each version has its own entry, and cross‑referencing is used to link them.
Important Notes
-
Use consistent reference coding.
-
Add clear cross‑references between physical and digital entries.
-
Keep descriptive content identical across linked records.
Example –

Minimum Metadata for Digitized Items
To support long‑term access and preservation, record at least the following information for each digitised file:
-
File format
-
File size
-
Date of digitisation
-
Resolution or quality
-
Number of versions
-
Access status
-
Storage location
-
Reference number or identifier
This information helps you track digital files over time and supports future migration or re‑digitization.
How Catalogue Records Support Digital Preservation
Catalogue entries play an important role in digital preservation:
-
They help track all versions of a file.
-
They ensure digital copies remain connected to their physical originals.
-
They support future format migration by identifying file formats and versions.
-
They help users understand which version is appropriate for access.
-
They reduce the risk of digital files becoming “orphaned” or forgotten.
Common Pitfalls
Community groups often encounter the following issues:
-
Not recording all versions of a file
-
Mixing physical and digital notes without clear headings
-
Using inconsistent naming or reference numbers
-
Forgetting to update catalogue entries when new digital versions are created
-
Losing track of where digital files are stored
Avoiding these pitfalls will make your catalogue more reliable and easier to maintain.
Maintaining Your Catalogue Over Time
Cataloguing is not a one‑off task. To keep your catalogue useful:
-
Review catalogue entries annually
-
Update entries when new digitised versions are created
-
Keep your Digital Asset Register aligned with your catalogue
-
Train volunteers to follow the same process
-
Document your chosen approach so future volunteers can continue it consistently
Key Takeaways
-
Keep cataloguing simple and consistent
-
Record all versions of each item
-
Choose an approach that fits your resources
-
Use clear cross‑references
-
Link catalogue work to your wider digital preservation activities
A Basic Digitisation Guide
 |
The digital age is in full swing, and more community archives than ever are digitising large amounts of their collections to preserve original items and make them available online. Digitization is a pre cursor to digital preservation (for more information see the ‘What is Digital Preservation’ document) and should not be undertaken without a plan to preserve the content you are digitising. This guide provides basic guidelines for converting physical materials into digital formats. It ensures consistency, quality, and proper handling of materials during the digitisation process. The guide assumes that you will be carrying out digitization within your community group. It is also possible to use external digitization companies, who will pick up your collections, digitize them to your requirements and return both the original items and digital copies to you. This can be an expensive option, but worth looking at if your group has a budget. More detailed digitization guidelines are provided by a range of organisations online. This guide is intended as a starting point to give your group things to think about before embarking on a digitization project |
Getting Started
Before you start digitizing, you need to decide what digital versions you want to create. You can choose to create preservation (high quality) or access (lower quality) copies or both. The option you choose will depend on what you want to use the copies for, as well as the budget and the resources that you have. You need to make sure that you have the budget and resources to carry out the digitization work, process the created items, and preserve them for the future.
The table below gives some options and the reasons for choosing them.
|
Option |
Outcome |
|
1 high-quality digital copy |
High-quality copies are used to produce physical prints, to be included in printed material like magazines or leaflets and for preservation purposes |
|
1 lower quality copy |
Lower quality copies are used online in a range of ways. They are not suitable for use in printed material, but can be used as access copies |
|
1 high and one lower quality copy |
This option means you’ll have a copy for all uses if you need this flexibility |
|
2 or more copies of each quality level |
This gives you multiple access and preservation copies. |
A note on resolution –
Digital Image Resolution refers to the amount of detail captured, typically measured in DPI (Dots Per Inch). The higher the resolution, the higher the image quality of your digital content will be and in turn, the more storage space the file will use. The resolution you use to capture your objects is essential to the success of your digitisation project. Suggested DPI for different item types is given below.
|
Text documents: 300 DPI minimum |
Photographs: 600 DPI minimum |
Fine art/detailed illustrations: 800-1200 DPI |
|
Maps/architectural drawings: 600-800 DPI |
Microfilm/microfiche: 300-400 DPI |
The next step is to select the equipment which will allow you to carry out your chosen digitization option.
Equipment
The equipment you use will be in essential in obtaining a usable result. Some suggestions of basic equipment to get you started and optional equipment for a more detailed set up are below.
Basic Equipment
Flatbed scanner (minimum 300 DPI capability)
should be used for:
-
Flat documents like letters, manuscripts, and papers
-
Small photographs and postcards
-
Magazine pages and newspaper clippings
-
Detailed documents where text clarity is crucial
-
Items that can lay completely flat
-
Materials where consistent lighting and scale are important
-
Documents where you need precise OCR (Optical Character Recognition)
Digital camera (minimum 12 megapixels)
should be used for:
-
Bound materials like books that can't lay flat
-
Fragile documents that shouldn't be pressed against scanner glass
-
Large format items that exceed scanner size (maps, posters)
-
3D objects and artifacts
-
Materials with texture or dimensionality
-
Items that need to be digitized without direct contact
-
Materials where speed is more important than perfect flatness
-
When you need to work in the field or at other institutions
-
Computer with sufficient storage
-
Back up options, such as cloud storage or an external hard drive
-
Basic image editing software that is compatible with your computer
Optional Equipment
-
Document feed scanner – useful for bulk scanning
-
Book cradle for bound materials
-
Colour calibration tools
-
Light box for transparencies
File Specification Suggestions.
Here are some suggested file formats and resolutions for digitized documents based on what they will be used for.
Preservation Files
-
Format: TIFF for images,
-
Resolution: Minimum 300 DPI for documents, 600 DPI for photographs
-
Colour depth: 24-bit colour or 8-bit grayscale
Access Copies
-
Format: PDF for documents, JPEG for images, MP3 for audio
-
Resolution: 150 DPI for online use
Naming Conventions
Whether you are creating preservation or access copies, naming conventions are important as they will help you keep track of and easily find files. Here are some suggestions to help you create naming conventions to suit your files and group context.
-
Use a consistent file naming structure
-
Include the digitisation date (DDMMYYYY is a useful format to use where possible)
-
Include the item references used in your catalogue
-
Do not use spaces or special characters
An example file name is: 12012026_DOC001_PAGE01
Quality Control
Once your items have been digitized, the is important to carry out quality checks to ensure that the process has been carried out correctly and nothing has gone wrong.
Basic Checks should include,
-
That the image is straight and properly cropped
-
The text is legible
-
The colours match the original
-
There are no visible dirt or marks
-
The file names used follow the specified conventions
-
All pages are present and in the correct order
Regular Monitoring should ,
-
Check that files open correctly
-
Verify that copies open and are not corrupt
-
Review samples of digitization work weekly to ensure good quality
Storage and Backup
It is important to be sure that you have enough resources and space to store and back up the files you are creating. Here are some suggested ways to manage this,
-
Create two backup copies
-
Store one backup copy offsite
-
Check backups quarterly to make sure they are still accessible
-
Look at topic 5 (Keep Your Content) of the toolkit matrix for more information
Metadata & Documentation
Making sure you have recorded the correct information about your files and the processes used to identify them is one of the most important steps in the process. This ensures that you have enough information about your files to keep track of them, train volunteers on the processes you use and fix any issues that may arise in the future. Here is some important information you may want to record,
Basic Metadata
-
Title of item
-
Date of creation
-
Creator/author
-
Physical description
-
Date of digitization
-
Person who digitized
-
Equipment used
-
Copyright status
Documentation
Keep records of:
-
Items digitized
-
Date of digitization
-
Any problems encountered
-
Special handling requirements
-
Time taken
-
Equipment settings used
Things to Remember When Handling Original Materials
-
Make sure your hands are clean and wear gloves for images only
-
Use supports for fragile items
-
Avoid exposure to direct sunlight
-
Handle items by the edges only where possible
-
Return items to proper storage after digitization
Copyright and Access
-
Check copyright status before digitising
-
Document permissions and usage rights when required and keep the information accessible
Emergency Procedures
-
Know the location of power switches
-
Back up work in progress daily
-
Keep equipment manuals accessible
-
Maintain a list of emergency contacts
Getting Started Checklist
-
Read through entire guide before starting work
-
Set up basic equipment
-
Practice with non-critical items
-
Start with simple, flat documents
-
Establish a folder structure for the digital files created
-
Create a backup routine
-
Begin documentation process
Carbon Footprint Toolkit

The Carbon Footprint Toolkit has been developed to support organizations undertaking digital preservation to understand, measure, and reduce the carbon footprint of their activities in a practical and proportionate way. It responds to growing interest within the digital preservation community for clear, actionable guidance that can be applied across a wide range of organizational contexts, technical infrastructures, and levels of experience with environmental reporting.
This toolkit has been created by the DPC’s Carbon Footprint Task Force and was released in March 2026 for community comment and testing.
We will be using this pre-release period to test the toolkit with a small support group and develop a set of case studies to be published alongside the full version of the toolkit in September 2026.
The toolkit consists of a guide (currently available as a Google doc) and an Excel spreadsheet tool:
-
Carbon Footprint Toolkit – The toolkit text is currently available as a Google doc for ease of commenting/editing/updating.
-
Carbon Footprint calculation tool (version 1) – The Excel spreadsheet tool can be downloaded and used to enter relevant data and calculate carbon footprint (current version v1, last updated 17th September 2026)
If you have any feedback on the draft toolkit please comment on the Google document or use this feedback form
|
Suggested citation of current version |
Digital Preservation Coalition (2026). Carbon Footprint Toolkit. Draft for comment |
|
Last updated |
March 2026 |
|
Date of next planned review |
Ongoing review during testing period (full release planned September 2026) |
This is a draft release of the Carbon Footprint Toolkit (released March 2026). This toolkit was created by the Carbon Footprint Task Force, chaired by Alicia Wise. Thank you to all of those who were involved! Read more and find out about how the toolkit was created here.
A Guide to Copyright for Community Archives
Written by Chris Morrison and Jane Secker, 2025
 Introduction
 Introduction
 Copyright is an important consideration when working with digital collections in community archives. Although working with copyright and related rights can become quite involved, the basic concepts behind how copyright works and applies to collections in community archives are quite straightforward.
Copyright works and usages
Copyright is a type of intellectual property right - a set of legal rights that regulate what people can do with the outputs of human creativity and innovation. Copyright protects a range of creative works such as books, letters, photographs, artworks, music, software, sound recordings and films.
In the UK the relevant legislation is the Copyright, Designs & Patents Act 1988. Copyright automatically arises in any sufficiently original creative work and will last for a set period of time - typically 70 years after the death of the author (or last author to die). However durations will differ depending on whether the work was published, the date it was created and the type of work it is. The National Archives have produced some very helpful flowcharts to work this out.
Copyright law regulates certain, specific activities which are called ‘restricted acts’ in the relevant legislation. These are:
-
Copying a work
-
Issuing copies to the public
-
Rental or lending
-
Public performance
-
Communicating works to the public - which includes broadcast and online uses
-
Adaptation
Copyright licences, exceptions and risk
Licences
 There are three main legal routes to doing any of these activities: Getting permission from the rights holder through a ‘licence’, making use of a ‘copyright exception’ or relying on a risk-managed approach. In practice most community archives will need to use a combination of all of these:
Licences present the lowest level of risk as it means using the work with the permission of the copyright holder. These can be formal, legal contracts or informal agreements. They can be paid for or provided for free. They will often have limitations as to who is able to benefit from them, for how long and in which country. Community archivists may use a range of different licences - for example subscriptions to digital resources and software from third party suppliers.
Community archives might also want to apply licences to the content they provide to their audiences, to indicate what people are allowed to do with the digitised collections. This is something their organisation will need to make some important and thoughtful decisions about which involve considering a range of factors. For example, whether the underlying works are in copyright or whether to apply an open licence to the works.
Licences can also be quite permissive - for example, the Creative Commons suite of licences which encourage and enable the ‘open’ sharing of copyright material. Creative Commons are the most widely used set of ‘open’ licences and they are made up of different components. For example they all require that users of the work attribute the author or creator, but some have non-commercial restrictions or prohibit the making of derivative works.
Copyright Exceptions
However, licences are not always available or appropriate. Therefore copyright exceptions are an essential part of the balance between the exclusive rights of the copyright owner and the wider social and cultural benefit of people and organisations being able to use copyright works in ways that are fair or reasonable without having to get permission. For example, UK law has copyright exceptions that allow libraries and archives to make copies of works for preservation purposes subject to certain conditions.
Fair Dealing and Fair Use
Many people are aware of the term ‘fair use’, but this is actually a doctrine of US copyright law. The UK equivalent is the concept of ‘fair dealing’ which is not defined in the legislation, but is a feature of a number of copyright exceptions. Fair dealing is intended to serve a similar purpose to fair use, but is more limited in that it must be aligned with a specific type of activity (e.g. parody or quotation).
Using a work in a way that would be considered ‘fair dealing’ means ensuring that if you use a work without the permission of the copyright owner, then this doesn’t undermine their legitimate interests. For example, if you were to provide free access to a work that the copyright owner is selling or licensing elsewhere, and as a result you were undermining sales, then this is likely to be unfair and therefore an infringement of copyright. Many uses of copyright material in education and research, such as using illustrative excerpts or images, are likely to be covered by fair dealing. However, it is important to consider each use on a case by case basis.
Risk Management
Risk management refers to the process of assessing whether to digitise and make works available where there is some uncertainty as to the legal status of a work or the communication of it. It involves asking the following questions:
-
What’s the likelihood that your activity infringes copyright?
-
What is the likelihood that the copyright owner will discover and object to your activity?
-
What would the financial and reputational impact be if the copyright holder was to take action against you or your organisation?
Orphan Works
Risk management is now an established route for archives to follow when dealing with diverse collections which may include what are known as ‘orphan works’. These are works where the copyright holder cannot be identified or contacted. If you decide you want to digitise an orphan work you can apply for a licence via the UK Government’s Orphan Works Licensing Scheme. Whether you decide to use risk management, apply for a licence or a combination of the two, you must do a ‘diligent search’ to try and track down any rightsholders. Diligentsearch.eu is a useful tool that can help you.
Worked Example
An amateur historian has donated her collection to a local historical society of which she was a member. The collection includes letters, books, journals, photographs, ephemera and videos in a range of different formats. How would the society archive address the copyright considerations of digitising the collection, preserving it and making it available to the public?
Here are some things to consider:
-
Are the items in copyright? If not, no rights clearance is needed
-
Who owns the copyright in the collection items? Can you get permission from the historian for the archive to use and reuse content they have created?
-
If relying on preservation exceptions, are the items now in the archive’s ‘permanent collection’?
-
Are any of the collection items ‘orphan works’ and if so, what is the archive’s due diligence process?
-
Should the archive use a risk managed approach, or is the UK Orphan Works Licensing Scheme more appropriate?
In Summary
-
Copyright automatically arises in any original creative expression recorded in a fixed form
-
Copyright only needs to be considered if you are doing a ‘restricted act’
-
Copyright licences come in many different forms from closed to open
-
Copyright is not just about licences; exceptions allow for many preservation activities
-
Copyright exceptions for preservation allow community archives to digitise in copyright material, but not necessarily make them publicly available online
-
In many situations you will need to think about ‘risk management’ – uncertainty is inherent in copyright law and is also desirable
Copyright for Community Archives Recording
Copyright for Community Archives PowerPoint and Script
Useful further reading
 Deazley, R (n.d) Copyright User.org Archives and Preservation Available at: https://www.copyrightuser.org/educate/archives/
Bodleian Copyright Guidance - https://www.bodleian.ox.ac.uk/ask/copyright
Copyright, Designs & Patents Act 1988 - https://www.legislation.gov.uk/ukpga/1988/48/contents
Copyright Literacy - https://copyrightliteracy.org/
Copyright User – https://copyrightuser.org (see in particular the sections on Archives and Preservation and Orphan Works)
EnDOW Due diligent search tool - https://diligentsearch.eu/
Intellectual Property Office (2020) Orphan works and cultural heritage. Available at: https://www.gov.uk/guidance/orphan-works-and-cultural-heritage-institutions
TNA Copyright Duration – https://www.nationalarchives.gov.uk/information-management/re-using-public-sector-information/duration-copyright/
Credits
This work is © Chris Morrison and Jane Secker 2025 and is licensed CC BY-SA
Keep Your Content – Level 3
 |
Storing Your ContentNow that you know what storage you currently have, and you know your options, it makes sense to look at what your current storage requirements are and how they might grow over time. Information gathered in your Digital Asset Register can help with this process. It will enable you to look at the best storage option for your content and put a plan in place to move your content should you ever have the funds and resources to do so. |
| Comparing the outcomes of your storage review against the pros, cons and specifications of the options you read about in level 2 will help you to choose the right storage option to suit your circumstances. Levels one and two of the ‘Control Your Content’ will also be invaluable here as you should work on the same principle of being able to access and easily move your content from anywhere you store it. Talking to suppliers will also be of use in this exercise as it will help you make sure your chosen system does what you need it to, and you are aware how the system works before you purchase. Further information about each storage medium can also be found online. |  |
Control Your Content - Level 2
 |
How to talk to SuppliersIf you are considering using any kind of software, system, or service to help you preserve and provide access to your digital collections, you need to make sure that you know what you need. Being able to talk to suppliers or creators will allow you to ask the right questions to make sure you get the most out of each conversation and ensure you get the product that is right for you, regardless of whether the software is free to use or paid for. |
The approach we recommend here is to take a holistic view of how you would like to manage your collections and what technological solution would enable you to do that. Considering the points below will help you to do this.
These points are broken down by the stages of the lifecycle to help you work through each step of your process and work out what is required.
Creation / Collection
|
Selection –
|
Description
|
Management –
|
Storage –
|
Preservation –
|
Use –
|
|
| Knowing what you need, what is a deal breaker and what are “nice to haves” will help your conversations with suppliers go smoothly and ensure you choose the right product for you.
Make sure you follow the advice in level one and don’t put your content anywhere that you don’t fully understand how you will get it back if you need to. |
 |
Control Your Content - Level 1
|
Exit StrategyHaving your digital collections locked into a particular system, app, service, or website can be a huge risk. Especially if that system or service is closed down, or you simply want to move it elsewhere. A common example is the use of Facebook groups by community organizations. They are relatively easy to setup and engage an audience, but if digital photos and other information is collected on a Facebook group, it’s very hard to extract that information so that it can be shared or preserved elsewhere. |
It is therefore critical ensure that any software, system, or website that you use has a clear exit strategy that details how you will get your data back if you decide to stop using them.
Just One Thing
If you decide to use a system to manage, preserve, or provide access to your content, make sure you understand the process to get your information back. This information should be included as part of any contract you sign. If it is not there, do not sign the contract and reassess your options.
Next steps…It is important to verify that you can successfully extract content before committing to using a particular system. Level 2 will explore how you can do this, what to look for as an adequate exit strategy and how to document it. |
|
Keep Your Content – Level 2
|
Storage OptionsNow that you know the storage you have is functional and accessible, it is worth looking into what options you have for long term storage of your content and any copies you make. Technology is constantly changing and researching the options currently available could not only save your group money but may also lead to a more suitable storage solution for your content. Some of the storage options currently available are detailed below along with some pros and cons of each. |
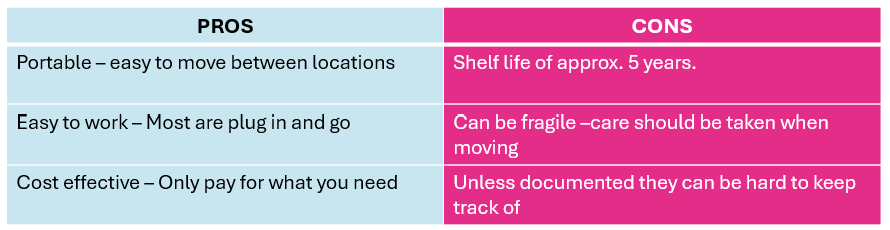
External Hard Drives
External Hard Drives are the same storage drives used inside laptops and desktop PCs, but they are encased independently and connect to a computer via an external connection, usually USB cable.
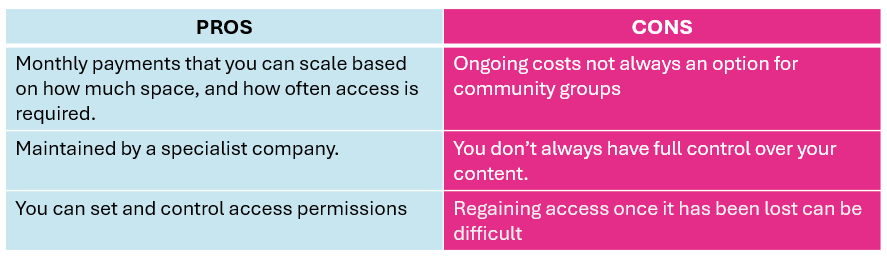
Third Party Cloud Storage Provision
These involve paying a fee (usually monthly) to a third-party service provider, to send copies of your digital content over a network. The provider may also maintain backups for you as part of the service.
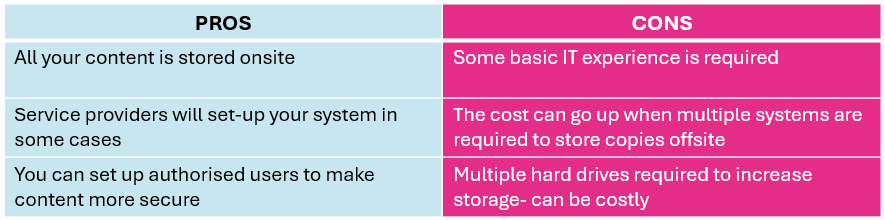
Network Attached Storage
A NAS is a storage device connected to a network that allows storage and retrieval of data from a central location, usually on your premises. You can control access permissions to further protect your content.
Next StepsNow you know what storage you have, and what your options are, it makes sense to work out what storage you need and how you go about putting this in place. Level 3 will help you work out your storage requirements which will help you choose the right option for your group. |
|
Make Copies - Level 3
 |
Check your copiesHaving more than one copy is one way of ensuring your files will remain accessible over the long term. However, it is also important to regularly check that the content you are storing hasn’t been changed or damaged in some way. Digital content is more fragile than physical records and will become obsolete or “rot” as technology and formats change or if storage media becomes damaged. The process of file checking is called fixity checking. This short clip explains why and how this is caried out. There are several ways of doing this. |
If you store your content in a cloud environment, such as Amazon AWS or Microsoft 365, your data will be backed up and basic checks carried out as part of the subscription you pay. This does not produce reports, so you won’t know if any files have been changed or fixed during the checks, but your files should remain operational. You can also pay extra on your subscription to have more in depth checks performed and logged.
If your files are stored on another medium, or you want to run a check yourself, the easiest option is Fixity Pro. An easy-to-use program which allows you to schedule and run your own fixity checks while providing detailed reports. Fixity Pro is $50 (or your local equivalent) per year, so is a cost-effective option. This video shows you how Fixity pro works.
Corz is another tool option, but make sure you read the listed disadvantages before you attempt to use it as it may not be suitable for your purposes. There are other software options available which are free to run, but they can be complex to use, and in some cases, knowledge of your computer command line or terminal, or coding experience may be needed to make them work
Subcategories
Template for building a Business Case
This section provides guidance on the content that will be useful to include in your business case, but it will likely need to be adapted to the structure used in your organization’s template.